What does Style-O-Matic do?
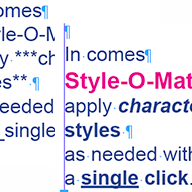 Style-O-Matic reads text frames in an open document, finds frames that contain a
[style-o-matic] config section, parses the markup rules defined in that config, then scans a story and applies InDesign character styles wherever it finds matching markup.
The result is that text like:
This is **bold** or *italic*.…becomes properly styled InDesign text, optionally with the markup tokens removed, with just a click.
YouTube demo: Style-O-Matic Demo
This is useful whenever text arrives with some ad-hoc convention for marking up formatting (copy from a CMS, a spec written by someone else, Markdown, home-grown HTML-ish tags, etc.) and you don’t want to hand-apply character styles run by run.
Installing
First, download and install the latest PluginInstaller from
You need at least version 0.2.6#769.
After unzipping and moving the application to your preferred location, you need to run PluginInstaller at least once.
If you have not registered for PluginInstaller before you will be asked to create an account first. Make sure to write down the unlock code you choose – if you lose it it cannot be retrieved.
After registering you will need to confirm your email address. Check your spam filter if necessary; you will need to click a link in an email to confirm the account.
Then click the following link which should open in PluginInstaller. It will install Style-O-Matic in your InDesign Scripts Panel. If your browser asks for permission to launch PluginInstaller, allow it to do so.
Install Style-O-Matic for InDesign
You can also uninstall the script by way of PluginInstaller, or install the script in older versions of InDesign.
Running
Style-O-Matic adds two entries in InDesign’s Scripts panel (Window > Utilities > Scripts, then look under the User folder):
-
Style-O-Matic.jsx — the script that does the actual work.
-
Copy Sample File with Documentation to Desktop.jsx — copies a demo document (
Style-O-MaticDemo.indd) to your desktop and opens it, so you have something to experiment with right away.
To run Style-O-Matic: open a document that has a config frame on the pasteboard, select a text frame (or click/select inside one), and double-click Style-O-Matic in the Scripts panel.
Quick Start
-
Run Copy Sample File with Documentation to Desktop once to get a demo document with a working config frame and sample text already in place.
-
Select the frame with the sample body text (not the config note).
-
Double-click Style-O-Matic in the Scripts panel.
-
A dialog reports how many marker pairs were found and styled.
-
Undo (
Cmd/Ctrl+Z) reverts everything in one step if you want to try again — Style-O-Matic runs as a single undoable action.
Once you understand the sample config, adapt it (or write your own from scratch) to match whatever convention your own text uses. Copy the config frame into your own document to enable Style-O-Matic.
Why a Pasteboard Config Frame
The rules that tell Style-O-Matic what to look for live in a plain text frame on the pasteboard of the document itself, rather than in a separate settings file. A frame is recognized as a config frame purely by containing a [style-o-matic] line — every other text frame in the document is scanned and skipped if it doesn’t have one.
Benefits:
-
Visible and editable right there in the document, no external file to lose or keep in sync
-
Travels with the document when it’s copied or handed to someone else
-
Can contain free-form comments and notes anywhere — anything not in
[section]orkey = valueform is ignored -
Straight and curly quotes are both understood, so it survives InDesign’s automatic “smart quotes” substitution
Setting Up Your Config Frame
1. The Marker Line
Every config frame must contain this line, on its own, to be recognized:
[style-o-matic]
You can optionally give the config a name (purely for your own reference — it has no effect on how Style-O-Matic runs):
[style-o-matic]
name = My Markdown Config
A rule’s definition is split into two parts, kept in two separate places in the config note: first you declare the marker pairs (the on/off markers), then — separately — you map marker pairs to character styles. Style-O-Matic reassembles same-named sections back into one rule regardless of where they sit in the note, so it reads naturally to declare all your marker pairs first, then all your style mappings afterward.
2. Declare Each Marker Pair’s On/Off
One section per marker pair, giving it a name and its on/off markup. Easiest if you don’t add charstyle here — that’s mapped separately in the next part:
[bold]
on = **
off = **
[italic]
on = *
off = *
[underline]
on = _
off = _
[htmlbold]
on = <b>
off = </b>
Notes:
-
onandoffcan be the same string (like**...**) or different (like<b>...</b>). -
Lines starting with
#are comments and are ignored.
A marker pair section can also carry any of these optional settings:
| Setting | Values | Effect |
|---|---|---|
literal |
yes / no (default no) |
If yes, nothing inside this marker pair is treated as another marker pair — only this rule’s own off can close it. Use this for things like inline code, where * or _ inside the code shouldn’t be styled. |
word-boundary |
yes / no (default no) |
If yes, the marker pair only triggers when it sits at a word boundary. Prevents, e.g., the _ in file_name from being read as an underline/italic marker. |
case-insensitive |
yes / no (default no) |
If yes, matching ignores upper/lower case — useful for HTML-style tags like <B> vs <b>. |
trim-whitespace |
yes / no (default no) |
If yes, leading/trailing spaces just inside the marker pair are removed before the style is applied. |
retain |
yes / no (default no) |
If yes, the on/off markup themselves are kept in the text instead of being stripped, and get styled along with the text they wrap. Handy for quotes, where you want the styled result to still show the quote marks. |
Example — inline code that ignores markup inside it, an underline tag that isn’t case-sensitive, and quotes that keep their quote marks:
[code]
on = `
off = `
literal = yes
[htmlunderline]
on = <u>
off = </u>
case-insensitive = yes
[quote]
on = "
off = "
retain = yes
3. Map Marker Pairs to Character Styles
Separately, list which character style applies to each marker pair — and to any combination of marker pairs you care about (see Nested Marker Pairs below). Repeat a marker pair’s own name to give it its plain style; two different marker pairs can map to the same style:
[bold]
charstyle = MyBold
[italic]
charstyle = MyItalic
[underline]
charstyle = MyUnderline
[htmlbold]
charstyle = MyBold
Here both [bold] and [htmlbold] apply MyBold.
Nested Marker Pairs: Combining Styles
When one marker pair is nested inside another, say, bold wrapping italic, you often want a different, purpose-built character style for that combination rather than just the inner style stomping the outer one.
There’s no way for Style-O-Matic to guess that style for you: the font that gives you bold and italic together is very often a completely different font style from either one alone (e.g. Bold might be “Font Heavy” and Italic might be “Font Slanted”, while bold+italic together might need “Font Medium Italic” — there’s no mechanical way to combine those font names).
So combinations must be spelled out — as another entry in the marker pair-mapping part of the note, named after the two (or more) marker pairs involved, joined with a dash:
[bold-italic]
charstyle = MyBoldItalic
With that in place, text like:
**bold *and italic* text**
applies MyBold to the whole run, and MyBoldItalic specifically to the “and italic” portion.
Points to know:
-
Order doesn’t matter.
[bold-italic]and[italic-bold]mean exactly the same thing — only write one of them. -
One entry covers it either way round. You don’t need a matching entry under a different name — declaring
[bold-italic]is enough whether bold wraps italic or italic wraps bold. -
More than two is fine.
[bold-italic-underline]is a valid combo section for three-deep nesting. -
If no matching combo is declared, the innermost marker pair simply wins — its own plain
charstyleis applied to its content, same as if the nested-style feature didn’t exist at all. Style-O-Matic never tries to merge or guess a combined look on its own. -
A combo only matches when it names exactly the full set of marker pairs currently nested at that point. E.g. if only
[bold-italic]is declared but the actual nesting is bold > italic > underline (three deep), that combo won’t match the underline run — you’d need a separate[bold-italic-underline]entry for that specific depth, otherwise the underline style alone is applied there.
Full example:
# Marker pair declarations
[bold]
on  = **
off = **

[italic]
on  = *
off = *

[underline]
on  = _
off = _

# Style mappings, including combos
[bold]
charstyle = MyBold

[italic]
charstyle = MyItalic

[underline]
charstyle = MyUnderline

[bold-italic]
charstyle = MyBoldItalic

[bold-underline]
charstyle = MyBoldUnderline
Important — use a dash in section/key names. Style-O-Matic’s config reader strips colons out of names entirely, so anything written with another separator (like
bold:italic) silently turns into a useless run-together name. Always use a dash:bold-italic.
Missing Character Styles Are Created Automatically
If a charstyle you reference (whether a plain rule’s style or a combo’s style) doesn’t already exist in the document, Style-O-Matic creates it for you automatically as an empty placeholder with that exact name, applies it, and reports a warning so you know it happened. This means Style-O-Matic never silently fails to apply a style — but a freshly auto-created placeholder has no formatting of its own yet.
After a run, check the warnings list for anything like:
Character style 'MyBoldItalic' not found - created placeholder style (rule 'italic')
and go define that style’s actual appearance (font, weight, color, etc.) in the Character Styles panel. On the next run, Style-O-Matic will find it and use it as-is.
Running the Script & Reading the Results
Select the frame you want processed (not the config frame itself — Style-O-Matic refuses to run on a frame it recognizes as a config note) and run the script. The results dialog reports:
-
Spans found — how many marked runs of text were detected.
-
Spans styled — how many were successfully styled.
-
Warnings — non-fatal issues, such as an auto-created placeholder style (see above), or an opening marker that was never closed.
-
Errors — anything that stopped a particular span from being processed.
An unmatched-opener warning looks like:
Unmatched opener '**' (rule 'bold') at story position 234
This means an on marker was found with no matching off before the end of the story — check your source text for a missing closing marker.
Troubleshooting
-
A rule doesn’t seem to do anything at all. Double-check the section has all three of
on,off, andcharstyle(whether in one section or split across two same-named sections as described above) — a rule missing any of these is skipped, and that particular skip is not shown in the results dialog. -
A combo style never gets applied. Check the section name is spelled with a dash (
bold-italic), and that both names exactly match the names of existing rule sections. -
Text looks styled but not quite how you expected. Remember nesting only produces a combo look where you’ve explicitly declared that exact combination — otherwise the innermost marker’s own style wins outright.
-
Nothing happens when you run the script. Make sure you selected a text frame, insertion point, or text — not just clicked on the pasteboard — and that at least one text frame in the document contains a
[style-o-matic]config note.
Known Limitations
-
Inline (character-level) styling only — no paragraph-style support.
-
No live preview: run the script to apply, undo to revert.
-
Wrapping the same rule inside itself (e.g. bold inside bold) isn’t supported — the first closing marker closes the first opening one, regardless of how deep you nested.
-
Auto-created placeholder styles have no formatting until you define it